To check if your iPhone’s all components are working properly, you can run a diagnostic test. This will help you determine if there is a problem with your device’s hardware and software. Also, performing this test will help you identify if there is a need for repair or replacement. But how can you perform a diagnostic test on an iPhone? In this article, I’ll explain how to run a diagnostic test on your iPhone so you can get your phone back up and running quickly. So, let’s get started!
How To Perform iPhone Diagnostic Test?
There are a few ways to perform an effective diagnostic test on your iPhone. According to your situation, you can go through customer service, run remote testing, or invest in diagnostics software.
Invest In Diagnostics Software
Using diagnostics software is the best and quick method to perform an iPhone diagnostic test. That’s because this type of software will run tests on your device and detect any hardware and software issues on your iPhone instantly. Furthermore, you can find diagnostics software online, and it is usually quite affordable. Luckily, there are several diagnostics software available in the market. The following are the three best apps that you can use for iPhone diagnostic testing:
Phone Doctor Plus
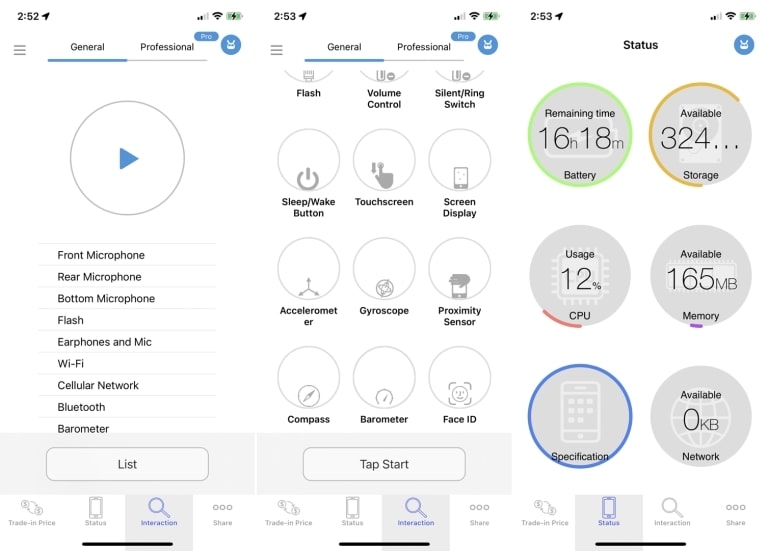
Phone Doctor Plus is one of the most popular diagnostic software for phones. It is compatible with the latest iOS version and has all the tools to detect hardware and software issues on your Phone. The app lets you run tests on memory, CPU, speaker, microphone, Wi-Fi, Bluetooth, GPS, touch screen, camera, and more. It automatically begins running a series of tests on your device and displays the results of any tests that detect problems. Here’s how to run a diagnostic test on your Phone using the Phone Doctor Plus app:
First, download and install the Phone Doctor Plus app on your iPhone device.
Open the app, and then tap the Play button to run all the tests on your Phone. Or you can swipe to the left to view a list of all available tests that you can run individually. Once the test is complete, the app will display your device’s results.
The app will also provide a Status screen that displays a detailed report of all running tests, including the battery charge, available storage, free memory, and network bandwidth. If you find problems with your iPhone device, the app will suggest possible fixes for the issues. Also, it lets you know what your phone is worth as a trade-in. In addition, the Android app offers a battery health test to determine if your battery is in good shape and an inventory report to ensure all the phone’s components are original.
Phone Diagnostics
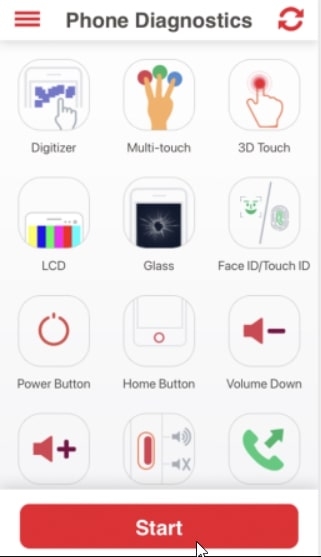
Phone Diagnostics is another useful diagnostic app that can help you detect issues on your iPhone. It is available iOS and is fully customizable to suit your needs. This app lets you test the functionality of your iPhone’s hardware from a single screen. It can detect issues with your Phone’s memory, touch screen, camera, speaker, microphone, Wi-Fi, cellular access, and more. To run a diagnostic test on your iPhone using Phone Diagnostics, simply open the app and select the button for the test that you want to run. If you wish to run all the tests one after the other, tap Start. The Digitizer test checks the touch screen, while the multi-touch test places three fingers on the screen. The camera test snaps photos using front and rear cameras, and the video record test records a quick video using the rear camera. The motion test asks you to move your Phone around, and the GPS test checks your location on a map. This app doesn’t provide any reports or results, but each successful test will turn its button green, and a failed or interrupted test will appear in red.
TestX
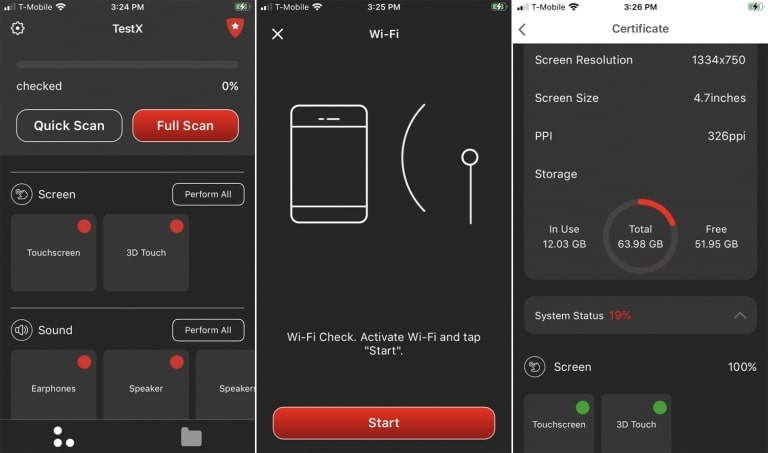
Another popular app that you can use for iPhone diagnostic testing is TestX. This app is free and designed for the iPhone and iPad. The TestX app can run diagnostics on your phone’s touch screen, SIM card, battery life, Wi-Fi, Bluetooth connectivity, earphones, speaker, microphone, accelerometer, compass, sensors, camera, and flash. This app offers your phone’s full specifications and performance in a neat report. Also, it lets you know if there are any problems with your Phone so you can make an informed decision about whether to fix it. Here’s how to run a diagnostic test on your iPhone with the TestX app:
Open the TestX app on your iPhone device. Now tap the Quick Scan button to check key features or click Full Scan to check everything. Alternatively, you can tap the test category or specific test you want to run.
Once the test is complete, a green circle will appear on the test, indicating that it has been completed successfully. After you’ve run all necessary diagnostic tests, the TestX app will display a full report of the results, including your device’s overall performance and whether any issues require attention.
As a bonus feature, the TextX app gives password-protected access to files, notes, photo albums, and other content you may wish to create and protect.
Contact Apple’s Customer Service
when you suspect your iPhone has a hardware problem, you can contact Apple customer support or visit a Genius Bar to test it. If you’re an iPhone user using iOS 10, you will need to go to an Apple shop to test your phone hardware, as calling the customer service line is not an option. Utilize diagnostics.apple.com with the assistance of an Apple Genius in order to run diagnostic tests on your phone
Remote Testing
You can also opt for remote testing if you want to run diagnostics on your Phone without visiting an Apple shop. You only need the device’s IMEI number (International Mobile Equipment Identity or the Phone’s social security number) to do this. An IMEI is a unique 15-digit code that allows smartphones to access cell phone networks and can give you the complete history of the device, including whether or not the device has been previously stolen or refurbished.
How to find the IMEI number on an iPhone device?
To find the IMEI number on your iPhone, open Settings, tap General, and then tap About. Now search for the serial number on the Phone. On the bottom of the page, you’ll see the IMEI number. Once you have your IMEI number, paste it into an Apple registration or support form to test it.
Why Should You Do An iPhone Diagnostic Test?
In this section, I’ll explain why you should perform an iPhone hardware test first. The following are the main reasons to run Apple diagnostics on your iPhone.
To confirm that a used iPhone’s hardware works before purchasing it. To determine the authenticity of an iPhone. To check that all the components of the Phone are working fine. Check to see if the iPhone has been opened and repaired before. To know whether or not any components of an iPhone have been replaced with new ones. Check the iPhone to make sure it is in its optimum condition.
Overall, performing the diagnostic test is essential as it allows you to identify any issues with your Phone.
Conclusion
As an iPhone user, it is crucial to know how to run iPhone diagnostic tests to detect any hardware issues promptly. It helps to keep your Phone running smoothly at all times. In this article, I have discussed different ways to run diagnostic tests on your Apple iPhone. Whether your iPhone is functioning correctly or not, you can determine it using the Diagnostics app or remotely testing your iPhone. And if you identify any issues, you can take steps to get them fixed or even replace your phone if necessary. Did you ever run diagnostic tests on your iPhone? What kinds of hardware issues did you find, and how did you address them? Please let us know in the comments below!
How To Change Snooze Time On iPhone? How To Chromecast From iPhone? How to Delete Multiple Contacts on iPhone?


